Overview
When Detached Mode is enabled on a Shelly Wave device, the physical input is separated from the relay output.
This means that pressing the connected wall switch or button does not directly switch the relay output anymore.
Instead, the device sends a Central Scene event to Home Assistant. These events can then be used in automations, scripts, scenes, or dashboard helpers.
Detached Mode is useful when the wall switch should control automations, scenes or trigger other events instead of directly controlling the local relay.
Important note
Central Scene events are not shown as normal switch or light entities in Home Assistant. This means you usually cannot place the detached input directly on a Lovelace dashboard as a normal ON/OFF entity. Instead, Home Assistant receives the button press as an event.
How Central Scene is shown in Home Assistant
With Z-Wave JS, Central Scene commands are exposed as events.
The most common event type is:
zwave_js_value_notification
This event is generated when the device sends a scene action, such as:
Single press (KeyPressed)
Double press (KeyPressed2x)
Hold (KeyHeldDown)
Release (KeyReleased)
Why it does not appear as a normal entity
A normal Shelly Wave entity, has the state of the output reported to the controller.
Example:
ON
OFF
Open
Closed
50%
A Central Scene event is different. It is a momentary action.
Example:
Button pressed
Button pressed two times
Button held
Button released
Because this action happens only at one moment, Home Assistant exposes it as an event instead of a normal switch entity.
How to see the events in Home Assistant
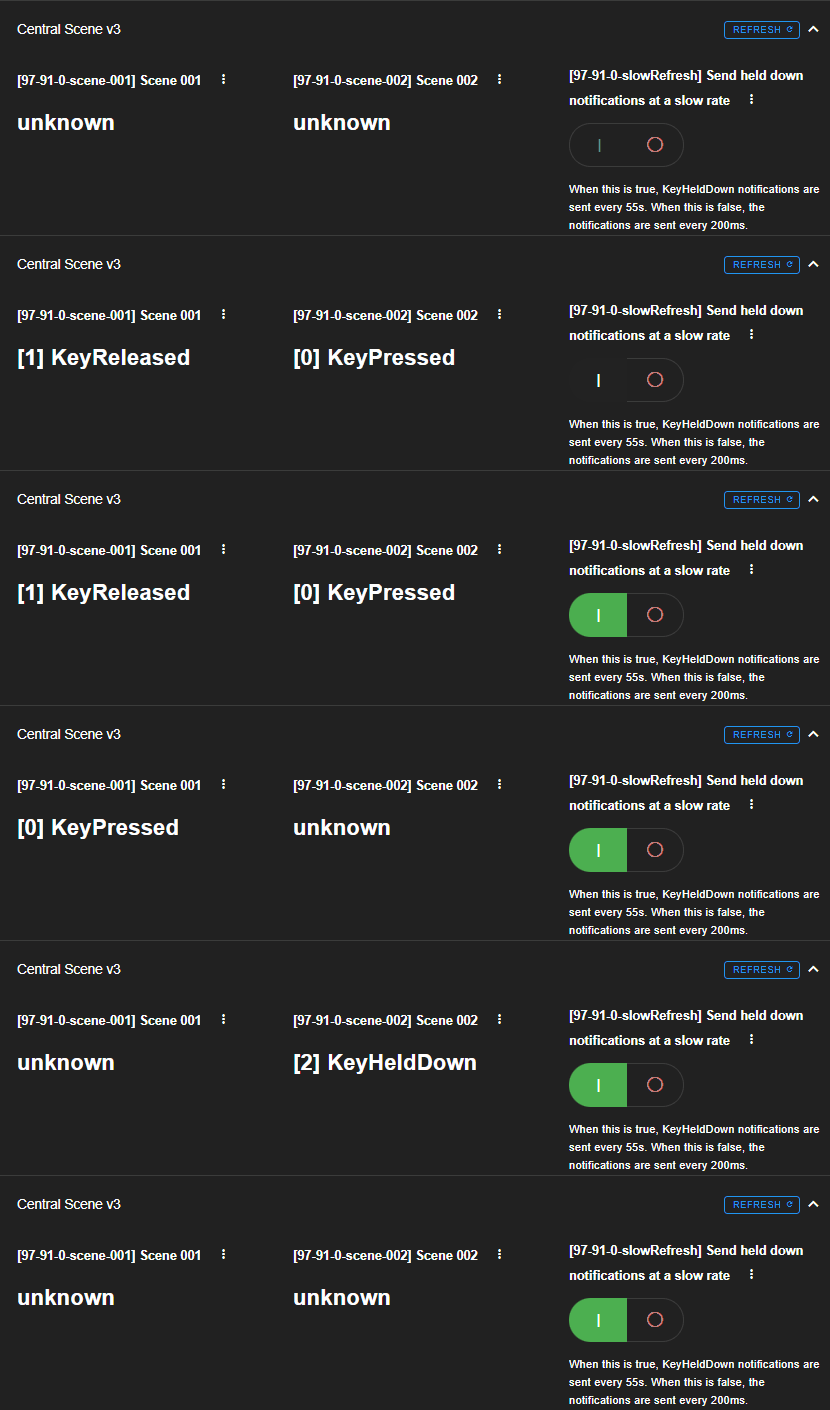
If you use Z-Wave JS UI you may find the events visible on the device tab Central Scene:
- Open Home Assistant.
- Go to Z-Wave JS.
- Select the device.
- Under Values choose Central Scene.
- Trigger the events using the button connected to the desires SW input.
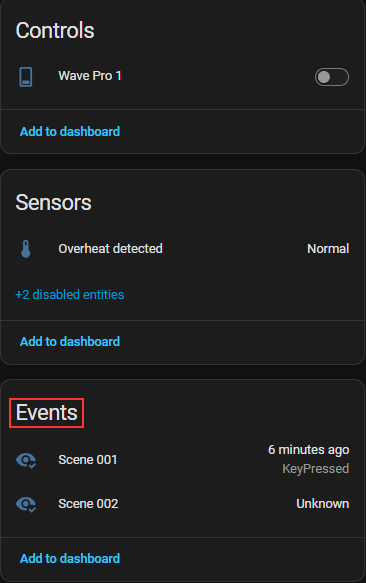
In Home Assistant, go to the Devices section, open the Z-Wave integration, and select the desired device. Once the device is selected, you will find the Detached Mode button events in the Events section.
Another way to check if the device is sending Central Scene events from Developer Tools.
Steps
Open Home Assistant.
Go to Developer Tools.
Open the Events tab.
In Listen to events, enter:
zwave_js_value_notification
Click Start listening.
Press the button or switch connected to the Shelly Wave input.
Check the event data shown in Home Assistant.
For debugging, you can also listen to all events by using:
*
This can help confirm which event is sent when the input is pressed.
Example: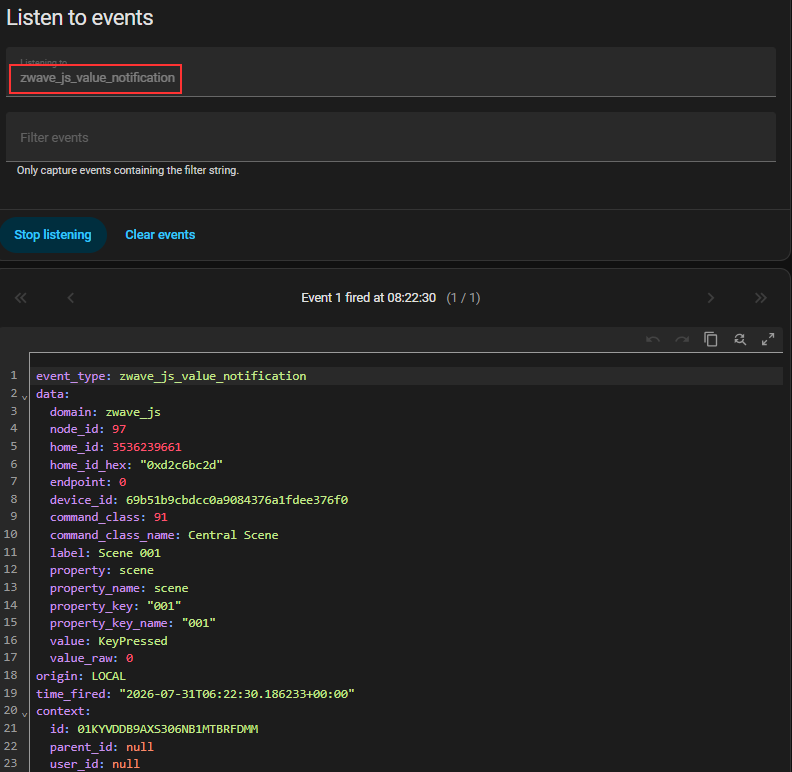
What to look for in the event data
When the event is received, check the event details.
Useful fields can include:
Device ID
Node ID
Property name (usually scene)
Property key attribute (this determine the SW number used)
Value
Event label
These values can be used later in an automation trigger. The exact fields may depend on the Home Assistant and Z-Wave JS version.
How to know which SW input triggered the event (SW1–SW4)
On Shelly Wave devices with multiple inputs, each input is mapped to a specific Central Scene ID. This allows you to identify exactly which physical switch was pressed.
Typical mapping is:
| Physical input | Scene ID in Home Assistant |
|---|---|
| SW1 | Scene 001 |
| SW2 | Scene 002 |
| SW3 | Scene 003 |
| SW4 | Scene 004 |
So in the event data:
- SW1 → Scene 001
- SW2 → Scene 002
- SW3 → Scene 003
- SW4 → Scene 004
Example event interpretation
If you see in Home Assistant:
propretary_key: 002This means:
- Scene 002 → SW2 was triggered
If you see:
scene_id: 1This means:
- Scene 001 → SW1 was triggered
Important note
The exact field name may appear as:
scene_idproperty_key- or inside
value
depending on the Z-Wave JS version.
But the mapping logic remains the same:
? Scene number = physical input number
How to use Detached Mode events
Detached Mode events are usually used with automations.
The automation listens for the Central Scene event and then performs an action.
The action can be anything supported by Home Assistant, for example:
Toggle a light
Turn on a scene
Control a relay
Control a dimmer
Control climate
Start a script
Send a notification
Update a helper
Change a dashboard status
Basic automation logic
The recommended logic is:
The Shelly Wave input is pressed.
The device sends a Central Scene event.
Home Assistant receives the event.
An automation is triggered.
The automation performs the selected action.
Example actions:
Single press toggles a light.
Double press activates a scene.
Long press adjusts brightness.
Release stops dimming.
Example automation
The example below uses general names. Replace the device ID and action targets with your own Home Assistant values.
alias: Detached Input Scene Control
description: ""

triggers:
  - trigger: event
    event_type: zwave_js_value_notification
    event_data:
      device_id: YOUR_DEVICE_ID
      property_key: "001"
      value: "KeyPressed"

conditions: []

actions:
  - action: light.toggle
    target:
      entity_id: light.example_light

mode: single
Example with different button actions
You can create different triggers for different button actions.
alias: Detached Input Multiple Actions
description: ""

triggers:
  - trigger: event
    id: single_press
    event_type: zwave_js_value_notification
    event_data:
      device_id: YOUR_DEVICE_ID
      property_key: "001"
      value: "KeyPressed"

  - trigger: event
    id: double_press
    event_type: zwave_js_value_notification
    event_data:
      device_id: YOUR_DEVICE_ID
      property_key: "001"
      value: "KeyPressed2x"

conditions: []

actions:
  - choose:
      - conditions:
          - condition: trigger
            id: single_press
        sequence:
          - action: light.toggle
            target:
              entity_id: light.example_light

      - conditions:
          - condition: trigger
            id: double_press
        sequence:
          - action: scene.turn_on
            target:
              entity_id: scene.example_scene

mode: single
Using trigger IDs is recommended because the automation reacts to the exact event that started it.
How to show Detached Mode activity on the dashboard
Detached Mode events cannot be shown directly as normal switch entities, but they can update visible Home Assistant helpers.
You can use helpers such as:
Input boolean
Input text
Counter
Input number
Template sensor
These helpers can then be displayed on the Lovelace dashboard.
Example: show the last button action
You can create an input_text helper, for example:
input_text.last_detached_input_action
Then create an automation that updates this helper when a Central Scene event is received.
Example:
alias: Show Last Detached Input Action
description: ""

triggers:
  - trigger: event
    event_type: zwave_js_value_notification
    event_data:
      device_id: YOUR_DEVICE_ID

conditions: []

actions:
  - action: input_text.set_value
    target:
      entity_id: input_text.last_detached_input_action
    data:
      value: "Detached input was pressed"

mode: single
You can then add this helper to the dashboard to show feedback.
Example: count button presses
You can also create a counter helper and increase it every time a button press is received.
Example:
alias: Count Detached Input Presses
description: ""

triggers:
  - trigger: event
    event_type: zwave_js_value_notification
    event_data:
      device_id: YOUR_DEVICE_ID
      value: "KeyPressed"

conditions: []

actions:
  - action: counter.increment
    target:
      entity_id: counter.detached_input_presses

mode: single
This can be useful for testing if Home Assistant receives the events correctly.
Recommended troubleshooting
If the Detached Mode event does not work, check the following:
Confirm that Detached Mode is enabled on the correct input.
Confirm that the SW input is set to [0] Momentary switch.
Confirm that the device is included correctly in Home Assistant.
Confirm that Z-Wave JS receives events from the device.
Listen for
zwave_js_value_notificationin Developer Tools.Press the physical button and check if an event appears.
Check the event data and use the correct values in the automation.
Make sure the automation trigger uses the correct
device_id,property_key, andvalue.Test with a simple action first, such as toggling a light.
Check if the device supports the button action you want to use.
Re-interview the device if event entities or scene data are missing.
Common mistakes
| Mistake | Explanation |
|---|---|
| Looking for a normal switch entity | Central Scene is an event, not a normal ON/OFF entity |
| Adding the event directly to Lovelace | Events are not shown like standard dashboard entities |
| Using the wrong event type | The common event type is zwave_js_value_notification |
| Not checking Developer Tools | Developer Tools helps confirm the exact event data |
| Using wrong event data in automation | The automation must match the received event fields |
| Expecting the relay to switch in Detached Mode | Detached Mode separates the input from the relay output |
Important note about relay output
When Detached Mode is active, the input does not directly control the local relay output. This is expected behavior. If you still want the button to control the relay, create an automation that listens to the Central Scene event and then controls the relay output.
Summary
In Home Assistant, Shelly Wave Detached Mode button actions are exposed as Central Scene events, not as normal switch or light entities.
The events are usually received as:
zwave_js_value_notification
Each physical input (SW1–SW4) is mapped to a specific scene:
- SW1 → Scene 001
- SW2 → Scene 002
- SW3 → Scene 003
- SW4 → Scene 004
To use them, create automations that listen for the event and then perform the needed action.
To show feedback on the dashboard, use Home Assistant helpers such as input text, counters, or template sensors.